The landscape of online gambling has seen significant transformations in recent years, particularly with the introduction of various bonuses designed to attract new players and retain existing ones. Bonus redemption refers to the process through which players can access and utilize their bonuses, whether they are free spins, deposit matches, or loyalty rewards. Understanding this process is crucial for players who want to maximize their gaming experience and ensure they are making the most out of the incentives offered by online casinos.
In Ontario, the gaming market is rapidly evolving, and players are becoming increasingly vocal about their experiences regarding bonus redemption. The speed at which a bonus can be redeemed is a significant factor in player satisfaction. Delays or complications in this process can lead to frustration and dissatisfaction. As players navigate the various platforms, they often share their opinions and experiences through reviews, highlighting the importance of quick and seamless bonus redemption.
The Importance of Speed in Bonus Redemption
Speed in bonus redemption is not merely a matter of convenience; it significantly impacts player satisfaction and retention. In a competitive market, online casinos must prioritize fast processing times to ensure players receive their bonuses promptly. A swift redemption process can enhance the overall gaming experience, allowing players to dive into their favorite games without unnecessary delays. This immediacy can be especially important when players are eager to capitalize on promotional offers or time-sensitive bonuses.
Moreover, the speed of bonus redemption correlates with the reputation of the online casino. Players are more likely to return to a site that honors its commitments swiftly and efficiently, such as tooniebetontario com. In contrast, a slow redemption process can tarnish a casino’s reputation, leading players to explore other options. The significance of this aspect cannot be overstated, as an online casino’s ability to meet player expectations directly influences its success in a crowded marketplace.
ToonieBet: A Quick Overview of its Offerings
ToonieBet has emerged as a popular choice among online gamblers in Ontario, particularly due to its attractive bonuses and promotions. The platform offers a variety of incentives, including welcome bonuses, no-deposit bonuses, and ongoing promotions that cater to both new and existing players. These bonuses are designed to enhance gameplay and provide players with opportunities to win without significant financial commitments.
In addition to its appealing bonuses, ToonieBet is known for its user-friendly interface and a wide selection of games. From slots to table games, players can find numerous options to suit their preferences. However, as with any online casino, the effectiveness of these offerings hinges on the speed at which players can redeem their bonuses. Thus, analyzing player reviews on the redemption process is essential to understanding how ToonieBet stacks up against its competitors.
Player Feedback: The Good, the Bad, and the Fast
Player reviews are invaluable resources for understanding the strengths and weaknesses of any online casino, including ToonieBet. Many players have praised the platform for its rapid bonus redemption speed, noting that they were able to access their bonuses almost immediately after meeting the wagering requirements. This efficiency has contributed to a positive overall experience, prompting many players to recommend ToonieBet to their friends and fellow gamblers.
However, not all feedback has been overwhelmingly positive. Some players have reported delays in bonus redemption, particularly during peak times when traffic on the site is high. Such experiences can lead to dissatisfaction, as players expect prompt service and support. In response to these concerns, ToonieBet has made efforts to enhance its systems and processes, aiming to streamline the redemption experience for all users. Gathering insights from these player reviews is crucial for understanding the casino’s performance and identifying areas for improvement.
Analyzing ToonieBet’s Bonus Redemption Speed
When evaluating ToonieBet’s bonus redemption speed, it’s essential to consider various factors that contribute to the overall experience. Many players have reported that the site offers a straightforward redemption process, with clear instructions on how to claim bonuses. This clarity reduces confusion and allows players to quickly access their bonuses without navigating through complicated terms and conditions.
To further illustrate this, we can examine user feedback on specific bonus types. For instance, many players have highlighted the efficiency of redeeming free spins, stating that they were able to start playing their favorite slot games almost immediately. Conversely, some users expressed frustration with the redemption of deposit match bonuses, indicating that the process could be improved. These insights reveal that while ToonieBet generally excels in speed, there are still areas where enhancements could be made.
Bonus Type
Redemption Speed
Player Satisfaction Level
Free Spins
Immediate
High
Deposit Match
Varies
Moderate
No-Deposit Bonus
Fast
Very High
Comparative Analysis: How ToonieBet Stacks Up Against Competitors
To assess ToonieBet’s performance regarding bonus redemption speed, it’s beneficial to compare it with other online casinos operating in Ontario. Many players often explore multiple platforms, and their experiences can offer valuable insights into how ToonieBet measures up. Some competitors may provide faster redemption times, while others might have more complicated processes that frustrate players.
For instance, a popular competitor may have a reputation for immediately processing bonuses, but this can come at the cost of limited bonus offerings. In contrast, ToonieBet’s variety of bonuses might take slightly longer to redeem but offers greater value in the long run. Players often weigh these factors when deciding where to invest their time and money. Conducting a thorough comparison can help players make informed decisions, ensuring they choose a platform that aligns with their preferences for speed and bonus variety.
User Experience: A Deep Dive into Player Opinions
User experience is a critical component of any online casino’s success, and player opinions shed light on the various aspects that contribute to overall satisfaction. In the case of ToonieBet, many players have commented on the ease of navigation and the simplicity of the bonus redemption process. Positive experiences with user interfaces can lead to higher engagement levels, as players feel comfortable exploring the site.
However, it is equally important to address negative experiences. Some players have pointed out that customer support responses can be slow during peak hours, which can hinder their ability to resolve issues related to bonus redemption. This feedback highlights the need for ToonieBet to enhance its customer service operations to align with players’ expectations for speedy assistance. By addressing these concerns, ToonieBet can improve its overall user experience and foster a loyal player base.
Factors Affecting Bonus Redemption Speed in Online Casinos
Several factors influence the speed of bonus redemption in online casinos, including the type of bonus, the platform’s processing capabilities, and the player’s adherence to terms and conditions. Understanding these factors can help players navigate the redemption process more effectively. For instance, bonuses that require specific wagering requirements may take longer to redeem, as players must complete certain criteria before accessing their funds or free spins.
Additionally, the technological infrastructure of the online casino plays a significant role in determining how quickly bonuses can be processed. Casinos with advanced systems may be able to handle redemption requests more efficiently, minimizing delays. Furthermore, player behavior can also impact speed; for example, submitting incomplete information or not following the redemption instructions may result in longer processing times. By being aware of these factors, players can take proactive steps to ensure a smooth redemption experience.
The Role of Customer Support in Bonus Redemption
Customer support is a vital aspect of the online gambling experience, especially when it comes to bonus redemption. Players often encounter issues or have questions regarding their bonuses, and prompt customer support can make all the difference in resolving these concerns. At ToonieBet, the quality and speed of customer support play a crucial role in the overall redemption experience, as players rely on assistance to navigate the process smoothly.
Many players have praised ToonieBet’s customer support for its responsiveness and helpfulness. However, there are instances where players have experienced delays in receiving assistance, which can lead to frustration, particularly when trying to redeem bonuses quickly. As the demand for online gambling continues to rise, it is essential for ToonieBet to invest in its customer support infrastructure to ensure that players receive timely and effective assistance when they need it most.
Conclusion and Future Considerations for Players
The opinions of players regarding bonus redemption speed at ToonieBet provide valuable insights into the overall user experience and satisfaction levels. While many players have reported positive experiences with quick redemption processes, some areas of improvement remain, particularly concerning customer support and specific types of bonuses. As the online gambling landscape continues to evolve, paying attention to player feedback will be crucial for casinos like ToonieBet to enhance their offerings.
For players, being informed about the nuances of bonus redemption can lead to better decision-making when choosing an online casino. By considering factors such as redemption speed, customer support quality, and overall user experience, players can select platforms that align with their gaming preferences. As ToonieBet and other casinos strive to improve their services, player feedback will remain an essential component in shaping the future of online gaming in Ontario.
Superbet Casino Review 2025 Expert and Player Reviews
Please be honest with yourself and refrain from playing in heightened emotional states. LegitimateCasino.com does not offer a service but acts as a resource / informational site. LegitimateCasino.com reviews Live and Online Gaming Operators to form an unbiased opinion and present it to readers. You could win up to $200,000 on Keno Megapays, making it the highest paying game in this category. However, the requirements to join other VIP levels vary depending on the deposit amount.
How do I play online casino games?
Since 2020, the Super Slots Casino has been active in the online gambling scene. It is a premier online casino that delivers a highly dynamic and entertaining gaming experience. The Casino offers a responsive, modern, and robust gambling platform powered by RTG, Betsoft Gaming, Dragon Gaming, Nucleus Gaming, and Visionary iGaming.
If your initial bets aren’t paying off, remember that it is ok to double down on a special event such as this, as long as you stay within your financial limits and play responsibly. Another good rule of thumb is to avoid placing more bets until you’ve put a solid amount of thought into your next move. Remember that Super Bowl halftime performances are often quite long, meaning there’s a lot of time to game plan ahead of the second half.
Super Peppers Slot Review
A plus point is that it welcomes a considerable number of jurisdictions with open hands. The best part is that you can place a bet once digital gambling is allowed legally in your jurisdiction. Of course, https://www.superphd.com/ that points to the US users, and other accepted territories. Last but not least, we come to the prepaid options at Superior Casino. Paysafecard and CASHlib are the services that you will have at your disposal. Both of them will allow you to make easy and convenient transactions, however, neither of them will give you the opportunity to withdraw your balance.
Legal states to bet on Super Bowl
Super Slots serves up a pair of weekly blackjack tournaments, both of which require $10 buy-ins and unlimited rebuys at $5. With the top 50 placers taking home prizes, these regular events have become a popular addition to those looking to put their competitive edge to the test. Here you’ll need to submit your first and last name, gender, date of birth, address, phone number, and agree to various terms and conditions. Simply click one of the many sign-up buttons you’ll be able to find on the site, then give your e-mail and create a password.
Casino Guru allows users to review and rate online casinos to share their experiences, views, and feedback. These allow us to calculate a general user feedback score that falls between Terrible and Excellent. Whenever we assess online casinos, we thoroughly examine each casino's Terms and Conditions to determine their level of fairness. When reviewing and assessing Casino SuperWins, our independent casino review team has weighed its advantages and drawbacks following our casino review methodology. But the site has excelled in key areas, making them one of the strongest players in the market. Our reviews give you a nice overview of what you can expect at an online casino.
With our guidance, you’ll uncover the excitement of online gaming, maximize your winnings, and gain the confidence to thrive at the top online casinos. Catering to both beginners and experienced gamblers, SUPERPH offers a thorough overview of the online casino ecosystem. Whether you’re searching for the latest games, seeking advice on managing your bankroll, or hunting for the best bonuses and promotions, SUPERPH has you covered. Our content is carefully curated by industry professionals, providing accurate and up-to-date information to enhance your chances of success. In addition to these features, it offers round-the-clock support to assist players at any time. It maintains an efficient payment process, making it easy and safe for players to manage their funds.
In the event that you need help, you need to be secure in the knowledge that there will be someone to assist you and answer your questions. Superior Casino has not neglected this and offers customer support to all players who visit the website. To our knowledge, Casino SuperWins is absent from any significant casino blacklists.
The app is optimized for Android devices, ensuring smooth gameplay and easy navigation. With a simple download from the Google Play Store, Android users can enjoy all that SuperPH has to offer. It’s advisable to consult the casino’s terms and conditions or reach out to their customer support for precise details regarding withdrawal processing durations. With a vast selection of games, Super Ace 88 ensures that there's something for everyone, regardless of your preferences or experience level.
Despite the licensing, Superior Casino does not operate in all jurisdictions. This could be for a variety of reasons, typically a lack of a license from the country’s regulatory authority or an outright ban on gambling. When it comes to withdrawing your balance, there will be some limits imposed on your transactions.
Online Poker Vælg de bedste online poker sider i Danmark
At tilbyde gratis bonusser er ofte også deres måde at sige “tak for at vælge os” på. De bedste online casinoer har altid givet spillerne en slags oplevelse, og som et resultat er der blevet tilføjet meget mere til casinospil. Forskellige typer kampagner og loyalitetsprogrammer er allerede en stor del af oplevelsen, men ud over at spille er der mange steder, hvor du kan deltage i forskellige turneringer. Ved at spille et bestemt spil kan du tjene dig selv gratis spins, lotteri eller endda kontantpræmier. Kun himlen er grænsen, når spillerne tilbydes godbidder i form af konkurrence. Guldbarrer, verdensomvisninger, spillebilletter, gasgriller og hættetrøjer.
Rich Wilde minder meget om Indiana Jones-filmene, for man bevæger sig ud i samme eventyrlige og dragende jagt på skatte og mytiske steder som i de gamle Harrison Ford og Sean Connery-film.
Har du hørt om et nyt casino med tilladelse i Danmark, men ikke ser det herinde, er du velkommen til at skrive til os med en forespørgsel på en anmeldelse.
Vi vil også nævne den gennemsnitlige udbetalingsprocent, velkomstbonus og spiludvælgelse for hvert casino.
Vi tjekker om der er cash-back, VIP-program, gratis spins og andre tilbud til at motivere eksisterende kunder med at være aktive på siden.
Hvad Bør Jeg Vide Med Anmeldelserne?
Der kan også være begrænsninger på, hvilke spil der kan spilles med bonuspenge. For eksempel kan nogle bonusser være begrænset til bestemte spillemaskiner eller bordspil. Hvis du spiller et spil, der ikke er inkluderet i bonusvilkårene, kan det betyde, at du mister dine bonuspenge. Nogle bonusser har krav om indbetaling og omsætningskrav, før du kan trække gevinster ud, så sørg for at læse alle betingelser og vilkår for at få mest muligt ud af din bonus. Uanset hvilken betalingsmetode du vælger, er det vigtigt at kontrollere, om casinoet accepterer den pågældende metode og sørge for, at betalingstransaktionerne er sikre og pålidelige. Med sin klassisk udseende hjemmeside tilbyder Bet365 Casino en sofistikeret spiloplevelse.
Diamond Plus – Valentine’s Edition: Udløs 15 gratis spins Progressive jackpots Høj RTP Luna Casino
RoyalCasino.dk er et af de mest unikke online casinoer på det danske spillemarked. Her er nemlig tale om en koncern, der ligeledes ejer det fysiske casino af samme navn med beliggenhed centralt i Århus. Som om det ikke var nok, er Royal Casino også ejer af hele to hoteller – det ene et eksklusivt 4-stjernet hotel, der også huserer casinoet.
Online Casino: Sådan finder du det bedste!
Som med alle andre ting, så er der nogle ting som er meget attraktive og nogle ting som måske ikke er helt så sjovt ved at spille på slots. Unibet er en af de mest velkendte navne indenfor bookmakere i Danmark og er også anset som værende en af de bedste bookmakere. De har en lang række sportsgrene du kan bette på, og tilbyder også live streaming af kampe og matches.
Gratis spins kan både være en del af en større velkomstpakke eller stå alene som en selvstændig bonus. Der er nogle meget generelle ting, som du skal være opmærksom på, når du kigger på danske online casinoer. Det er nemlig sådan, at de fleste danske casinoer har sådan noget med, at man skal logge ind med NEM-ID.
Og, lægger du ud med at vinde dine første væddemål, indgået med de gratis beløb, så er det jo bare fantastisk. Størstedelen af online casinoer tilbyder i dag en eller flere former for bonusser, som giver ekstra værdi til spillerne. Her på Casino guiden vil du kunne læse om, hvilken eller hvilke typer af bonusser hvert enkelte casino udbyder. Det kan være alt fra bonus ved første indbetaling, gratis spins eller løbende bonusser til spillere. Det er som nævnt oven for et krav, at alle casinoer skal bestå vores test. Det er faktisk ikke alle casinoerne, der kan bestå testen, og det skyldes, at de ikke på alle nedenstående parametre kan leve op til vores høje standarder.
Kan jeg udbetale gevinsterne fra mine free spins?
Svar på tre enkle spørgsmål, og vi finder det bedste casino til dig. Casinoet angiver, at det tilbyder live chat på Finsk i mindst et par timer på alle hverdage. Vi tror på, at Sugar Rush 1000 information er nøglen til at træffe de bedste beslutninger, når det kommer til online gambling.
Når først du har gennemspillet din bonus ifølge casinoets krav, har du frie hænder til at udbetale eventuelle gevinster. En bonus hvor dine gevinster ikke er omfattede af gennemspilskrav. Gevinster fra Gratis Spins er ofte bonusser uden gennemspilskrav. Når du undersøger hvor stor casino bonussen er, skal du ikke kun kigge på det fremhævede beløb.
Top Casino en Ligne: Classement des Meilleurs Sites 2025
La convivialité des casinos mobiles est une priorité, avec des interfaces optimisées qui nécessitent peu de saisie de données, rendant le jeu en déplacement aussi agréable que possible. Les paiements mobiles et SMS, rapides et sécurisés, ajoutent une dimension supplémentaire de facilité et d’efficacité, rendant l’expérience utilisateur fluide et sans accroc. Avec une ludothèque dépassant jeux, les joueurs sont assurés de trouver des titres qui raviront leurs sens et mettront au défi leurs compétences. Cette profusion de divertissement est soutenue par une interface élégante qui évoque la fraîcheur et le luxe de la Côte d’Azur. Ces critères sont les piliers d’une expérience de jeu exceptionnelle, et ils doivent être immédiatement perceptibles sur les plateformes que vous envisagez.
Voici l’ensemble des meilleurs bonus que vous pourriez croiser sur les différents casinos en ligne et ce à quoi ils correspondent. Une fois votre compte approvisionné, plongez dans l’immense catalogue de jeux d’Evobet. La facilité d’accès à un bonus dépend d’un ensemble de conditions que vous devez prendre en compte. Si un bonus demande des conditions de mise de 30 fois en 30 jours, celui-ci sera plus accessible qu’un bonus avec les mêmes conditions de mise à réaliser en seulement 7 jours. Le wagering désigne le montant du bonus à parier afin de convertir les gains du bonus en argent réel. Sur les casinos sans wager, vous n’avez pas besoin de remplir ces exigences.
A part le welcome bonus, les sites de jeux préparent aussi une ribambelle d’offres promotionnelles.
Même si l’accès au programme VIP d’Arlequin se fait uniquement sur invitation, la transparence est garantie.
N’oublions pas l’importance de la sécurité, de l’équité et du jeu responsable, qui demeurent des priorités absolues pour une expérience de jeu saine et agréable.
Pour celles et ceux qui ne connaissent pas encore le site, Spinanga est un casino en ligne sécurisé et fiable, licencié par Curaçao Gaming.
Les casino proposent généralement ces bonus pour le week-end, ou pour un jour en particulier dans la semaine.
⭐Programme de fidélité
Le but est bien sûr de les inciter à s’inscrire sur leur site et/ou à y jouer activement. Tout d’abord, vous devez savoir que le solde cash représente l’argent réel déposé sur votre compte. Par contre, le solde bonus correspond aux différents bonus casino en ligne que vous avez obtenu. D’autre part, des offres promotionnelles requièrent l’usage d’un code bonus.
Bonus de casino en ligne à réclamer
Sauf dans le cas où un casino propose un bonus sans dépôt, pour obtenir un bonus de bienvenue, vous devrez réaliser un dépôt avec un montant minimum et maximum qui vous seront imposés. Casino Night attire les joueurs avec des bonus captivants qui ajoutent une touche d’excitation à chaque session de jeu. En combinant un bonus de bienvenue généreux, des promotions hebdomadaires variées, et un programme de fidélité, le casino s’assure que les joueurs restent engagés et récompensés tout au long de leur expérience. Les jeux avec croupier en direct ajoutent une couche d’immersion, rapprochant les joueurs de l’atmosphère palpitante d’un casino réel. Ces jeux offrent des interactions en temps réel avec des croupiers professionnels et permettent aux joueurs de ressentir l’excitation d’une véritable salle de jeux, le tout depuis le confort de leur foyer. Avec l’accès mobile et la possibilité de jouer sans téléchargement, les casinos en ligne invitent les joueurs à explorer un univers riche et diversifié de divertissement, à portée de main.
Cela s’explique par une offre complète de paris sportifs, mais aussi avec des tournois de poker organisés quotidiennement. Depuis sa création en 1998, Winamax s’est développé autour du monde des paris sportifs, avant de proposer de se spécialiser dans les jeux en direct. La plateforme est aujourd’hui connue pour ses nombreux tournois de poker sur internet et partout autour du monde.
Il faut le reconnaître, les bonus de casino sont une véritable manne pour nous, amateurs de jeux d’argent. Grâce à ces généreux cadeaux, nous avons de quoi financer les parties sur nos jeux de casino en ligne préférés. Sachez que chaque opérateur fournit un pack de bienvenue aux nouveaux joueurs. Ainsi, sur un casino en ligne avec bonus de bienvenue, vous êtes en mesure d’obtenir de l’argent bonus, des Free Spins, du cashback, etc. Effectuez votre premier dépôt et bénéficiez d’un bonus de bienvenue de 100% pouvant atteindre 500€.
Que vous cherchiez des machines Megaways, des machines classiques, ou des machines avec des fonctionnalités particulières (symboles spéciaux, fonction cascade…), vous serez satisfaits de la collection de Spinanga. Depuis sa création en 2005 à Londres, Betclic a connu une ascension fulgurante partout dans le monde, jusqu’à se développer en France en 2010. La plateforme s’est notamment développée en réalisant des partenariats avec de nombreux groupes sportifs. Reconnaître les comportements à risque est crucial pour intervenir avant que le jeu ne devienne problématique. Jouer compulsivement, tenter de récupérer Bet On Red ses pertes en augmentant les mises ou éprouver de l’irritabilité sont des signaux d’alarme.
Raison pour laquelle nous avons sélectionné les sites possédant les meilleures promotions du marché. La réalité augmentée et virtuelle est susceptible d’attirer une nouvelle génération de joueurs, désireux d’explorer ces mondes virtuels fascinants. Les plateformes qui adoptent ces tendances avant-gardistes sont destinées à se démarquer, en attirant les joueurs à la recherche de sensations fortes et d’innovations. Cette orientation vers la technologie de pointe reflète l’évolution constante des casinos en ligne et leur engagement à offrir des expériences captivantes et avant-gardistes. L’évolution des casinos en ligne s’est harmonieusement couplée à la montée en puissance des dispositifs mobiles. Les casinos mobiles offrent la liberté de jouer n’importe où, n’importe quand, à condition de disposer d’une bonne connexion internet.
Avec une large sélection de jeux constamment renouvelée, vous avez l’embarras du choix et pouvez même tester les eaux sans risque grâce à des jeux gratuits. C’est une aubaine non seulement pour les fins stratèges mais aussi pour ceux qui cherchent simplement à se divertir sans pression. Dans une ère où la commodité et l’accessibilité sont primordiales, les casinos en ligne présentent des avantages indéniables. Jouer en ligne signifie pouvoir accéder à vos jeux préférés à tout moment, sans contraintes de déplacement ou de temps. Mais pourquoi d’autres joueurs et vous-même devriez-vous privilégier le jeu en ligne? Les raisons sont multiples et touchent à des aspects aussi variés que la sécurité, la variété des jeux et la flexibilité des plateformes.
Download Stunning Windows 11 Wallpaper 4K for Free
Are you looking to give your desktop a fresh new look? We’ve got you covered with stunning Windows 11 wallpaper 4K download options that are completely free! Our collection features a variety of high-resolution Windows 11 wallpapers that will make your screen pop.
You can easily download Windows 11 desktop backgrounds that suit your style and preferences. Whether you love nature, abstract designs, or futuristic themes, we have something for everyone.
Don’t miss out on the chance to enhance your workspace with beautiful visuals. With our Windows 11 4K wallpapers free to download, transforming your desktop has never been easier. Explore our selection today and enjoy the beauty of high-resolution Windows 11 wallpapers!
We have an amazing collection of Windows 11 wallpapers that will surely meet your needs. Whether you’re looking for something vibrant or calming, our Windows 11 wallpaper gallery has it all. We can explore the best Windows 11 wallpaper sites together to find the perfect fit for our screens.
Here are some categories we can dive into:
Nature-themed Windows 11 wallpapers
Gaming wallpapers for Windows 11
Abstract designs
Minimalist styles
Windows 11 Wallpaper 4K Nature
For those of us who love the great outdoors, we can find stunning nature-themed Windows 11 wallpapers that bring the beauty of nature right to our screens. These Windows 11 nature backgrounds are perfect for nature lovers like us. Imagine having a serene forest or a breathtaking mountain view as our desktop background!
Here are some popular options we can consider:
Forest landscapes
Ocean views
Mountain ranges ⛰️
Flower fields
Windows 11 Wallpaper 4K Gaming
If we are gamers, we can find exciting gaming wallpapers for Windows 11 that reflect our passion for gaming. With various Windows 11 gaming themes, we can customize our desktops to match our favorite games.
Here are some themes we might enjoy:
Action-packed scenes
Fantasy worlds
Sci-fi adventures
Iconic game characters ️
Windows 11 Wallpaper HD 1920×1080 Download
For those of us who prefer high-definition visuals, we can easily find Windows 11 Wallpaper HD 1920×1080 download options. These wallpapers are perfect for our PCs and will make our screens look sharp and vibrant.
Here’s what we can do:
Browse through our favorite styles
Choose the perfect Windows 11 wallpaper download
Enjoy a stunning display on our Windows 11 wallpaper for PC
With so many options available, we can truly personalize our desktops to reflect our unique tastes and interests!
Browse Premium Images for Windows 11
We can explore a fantastic selection of premium images for our Windows 11 experience. With the right Windows 11 wallpaper app, we can easily find and customize our desktop backgrounds to suit our style.
Using a Windows 11 wallpaper tool, we can browse through various categories and discover stunning visuals that resonate with us. Whether we want something vibrant or calming, there’s a perfect wallpaper waiting for us.
Here’s how we can get started:
Search for specific themes: Nature, abstract, or minimalistic.
Use filters: Narrow down our choices based on color or style.
Save our favorites: Create a collection of wallpapers we love.
Download Windows 11 4K Black Blue Art Wallpaper
For creative professionals, downloading the Windows 11 4K black blue art wallpaper can be a game-changer. This wallpaper is not just visually appealing, but it also inspires creativity and innovation.
Artists and designers can find this wallpaper particularly useful as it adds a touch of sophistication to our workspace.
As photographers and tech enthusiasts, we can find a variety of artist wallpapers for Windows 11 that truly reflect our passions. These wallpapers are designed to inspire and motivate us every day.
For minimalists, there are also options that offer a clean and simple look, making our desktops feel organized and calm.
When we think about enhancing our screens, there are so many exciting options available. We can explore various types of wallpapers that fit our needs perfectly.
Here are some popular categories we might be interested in:
Windows 11 wallpaper for dual monitors: Perfect for those of us who love multitasking.
Windows 11 wallpaper for ultrawide screens: Ideal for gamers and movie lovers.
Windows 11 wallpaper for laptops: Great for on-the-go users.
Windows 11 Wallpaper 4K Download Full Screen
If we want to make our screens look stunning, we should consider downloading Windows 11 wallpaper 4K download full screen. These wallpapers are designed to fill our screens beautifully.
We can also find:
Windows 11 wallpaper 4K download free: Perfect for those of us on a budget.
Windows 11 wallpaper for smart TVs: Great for adding style to our living rooms.
Windows 11 Wallpaper 8K Options
For those of us who want the best of the best, we can dive into the 8K Windows 11 wallpaper collection. These wallpapers offer incredible detail and clarity.
Here’s what we can find:
Windows 11 wallpaper 8K: Perfect for high-resolution displays.
Windows 11 wallpaper for gaming setups: Ideal for gamers looking to enhance their experience.
Windows 11 Wallpaper 4K 1366×768 Resolution
If we have specific screen resolutions, we can look for Windows 11 wallpaper 4K 1366×768. This resolution is perfect for many laptops and workstations.
We can also explore:
Windows 11 wallpaper for workstations: Great for professionals who want a clean look.
Windows 11 wallpaper for home office: Perfect for creating an inspiring workspace at home.
Additional Resources
We can explore various options for Windows 11 wallpapers that cater to different devices and preferences. Whether we are using tablets, Android, or iOS, there’s a perfect Windows 11 wallpaper for us.
This HD Wallpaper is About Windows 10
For those of us who love versatility, we can find Windows 11 wallpaper for Linux, Windows 11 wallpaper for Mac, and even Windows 11 wallpaper for mobile. These options ensure that no matter what device we use, we can enjoy stunning visuals.
Sci-Fi Astronaut 4K Dark (1920×1080) Resolution Wallpaper
If we are maximalists, gamers, or nature lovers, we can find exciting Windows 11 wallpaper for maximalists, Windows 11 wallpaper for gamers, and Windows 11 wallpaper for nature lovers. These wallpapers can truly enhance our experience and reflect our interests.
Lucky Star Windows XP Anime Izumi Konata Technology Windows HD Art
For tech enthusiasts, creative professionals, and artists, we can discover amazing Windows 11 wallpaper for tech enthusiasts, Windows 11 wallpaper for creative professionals, and Windows 11 wallpaper for artists. These wallpapers can inspire us and add a unique touch to our screens.
We often have questions about finding the perfect wallpapers for our Windows 11 devices. Let’s dive into some frequently asked questions to help us out!
What are the best sources for Windows 11 wallpaper 4K downloads?
When we’re on the hunt for the best Windows 11 wallpaper sites, we want to make sure we find high-quality images.
Here are some great sources we can explore:
Windows 11 wallpaper app: This can help us find and customize our wallpapers easily.
Windows 11 wallpaper tool: A handy tool for browsing and selecting our favorite backgrounds.
Windows 11 wallpaper gallery: A collection of stunning images to choose from.
Are there any free options for downloading Windows 11 wallpapers?
Absolutely! We can find plenty of free Windows 11 wallpaper download options that won’t cost us a dime.
Here’s what we can look for:
Windows 11 4K wallpapers free: High-resolution images that look great on our screens.
Windows 11 wallpaper download: Easy access to a variety of wallpapers.
Windows 11 wallpaper for PC: Perfect for personalizing our desktop experience.
How can I set a 4K wallpaper on my Windows 11 desktop?
Setting a 4K wallpaper on our Windows 11 desktop is simple and fun!
Here’s how we can do it:
Windows 11 wallpaper customization: We can adjust settings to fit our style.
Windows 11 wallpaper for dual monitors: Perfect for those of us who use multiple screens.
Windows 11 wallpaper for ultrawide screens: Ideal for gamers or anyone who loves a wider view.
With these tips, we can easily enhance our desktop experience!
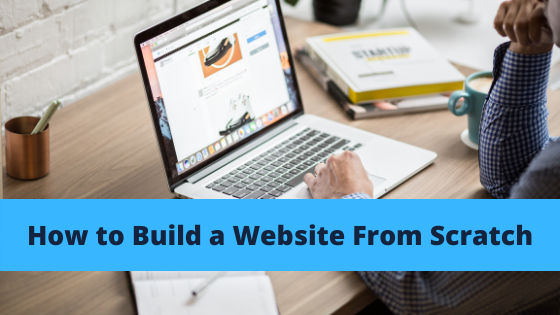
In this article, I’ am going to show you how to build a website from scratch for your business as well as for other clients. This article will guide you on how to build a website from scratch step by step.
Disclaimer: This article contains affiliate links. I may make a commission if you signup through my link at no extra cost to you.
Attention:Free Download| Smart Guide to Customizing ANY Website Like Like a PRO! Click Here
To build a website from scratch is actually very simple and easy to do following some of the steps am going to be showing you in this blog post without coding. All you need is the right tools and resources to get started.
There are actually three steps involved in building a professional website. These are:
A domain name and Hosting
Website Building Platform
Setup and Customize Website
1. A domain name and Hosting: A domain name is the name of your business website which is in form of address while hosting is where your websites files are kept and it helps people find your website on the web. The two items mentioned above are very important when you want to build a website from scratch.
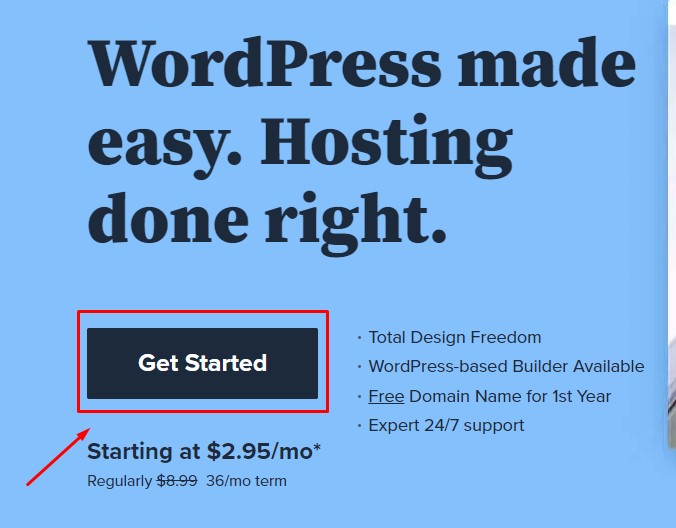
By the way, do you know that you can get your domain name for FREE with Bluehost when you buy your webhosting from them? You can use this link to get a free domain name for one year.
To get started with your website building process, head over to Bluehost and click on get started.
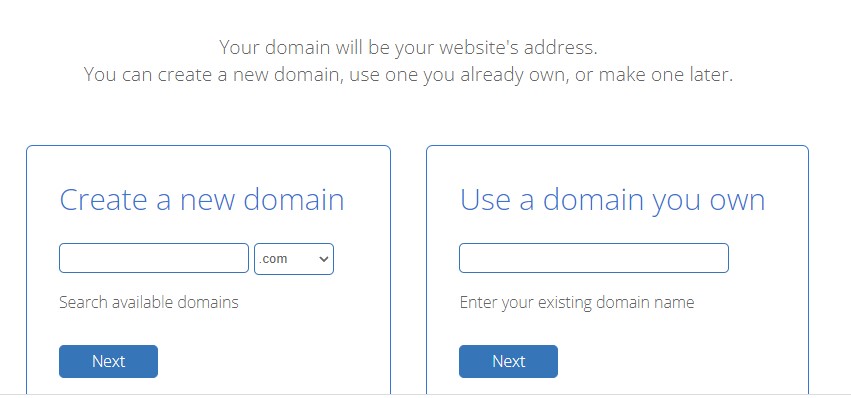
Type in your domain name or use an existing domain.
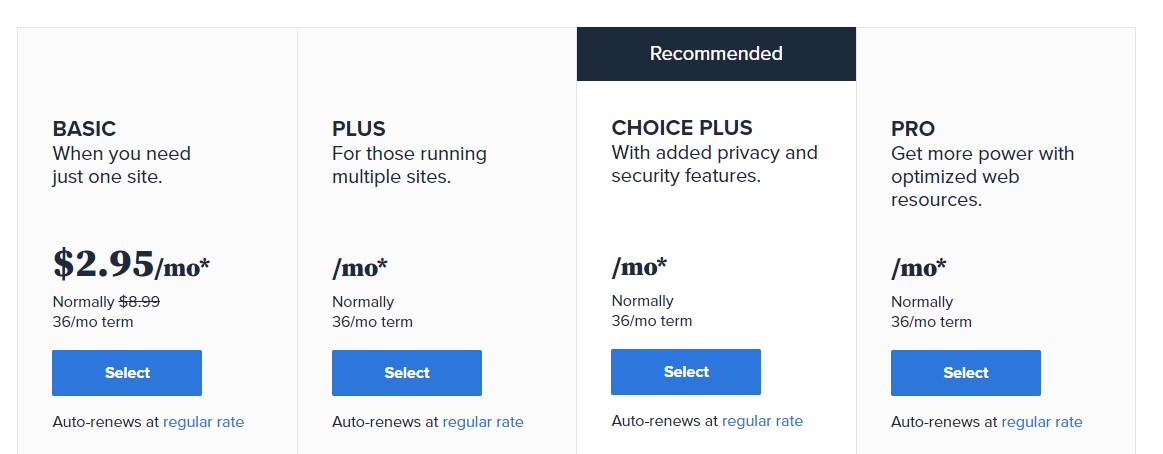
On the next page, you are to choose a plan
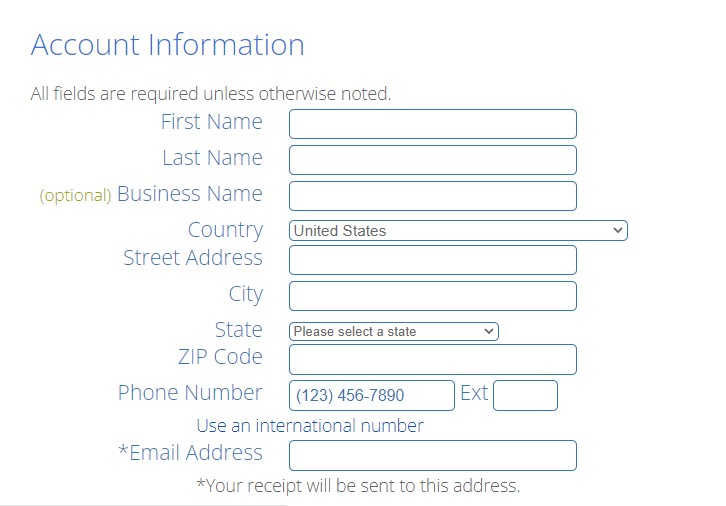
Next, fill in your account details.
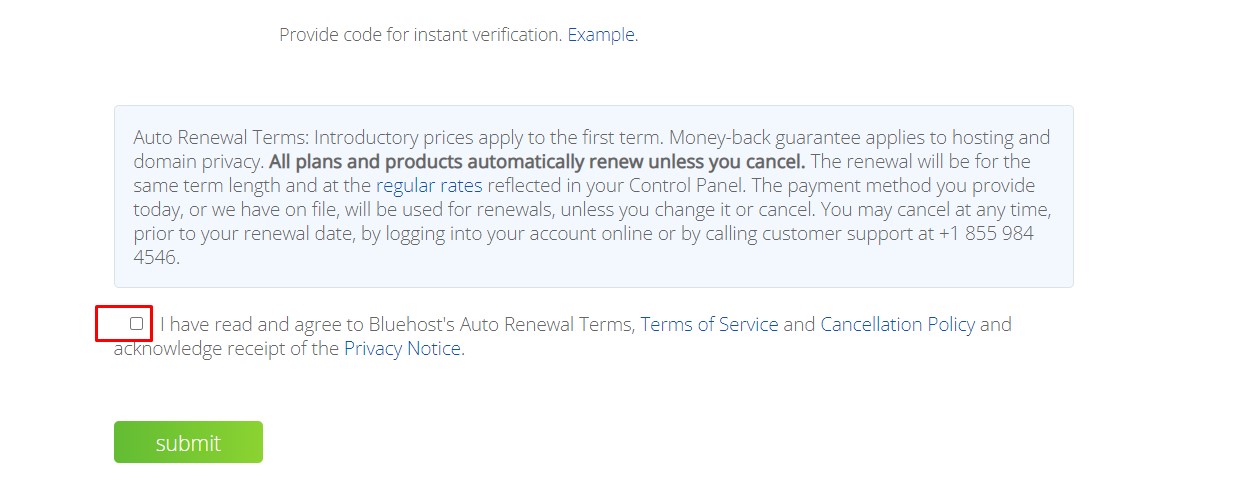
Check Your Plan Information and Finish the Registration Process by clicking the submit button.
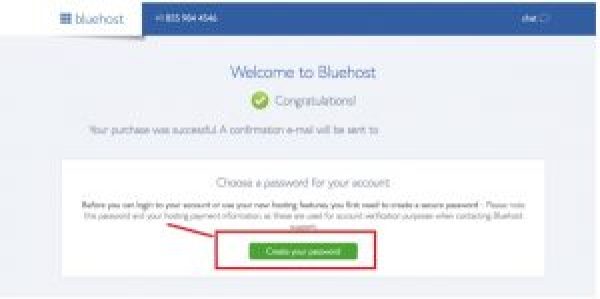
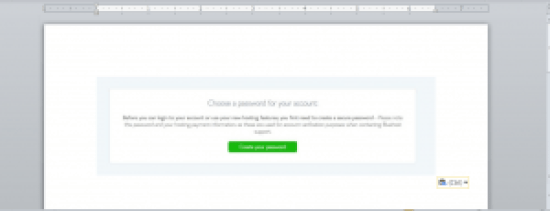
The next step is to confirm your account by logging in to your email account and clicking the verify button to confirm your account.
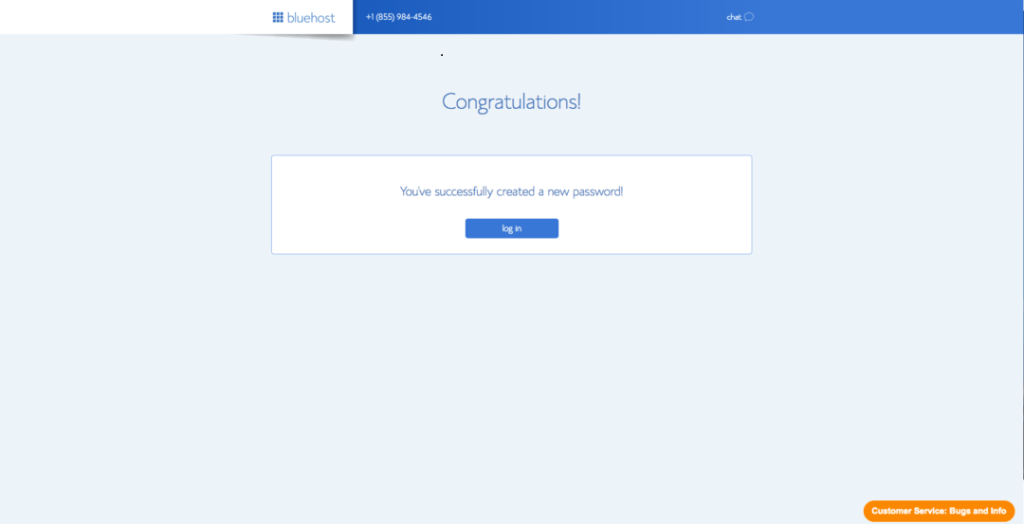
Next, scroll down to create your password under the congratulatory message that you have on your screen.
Make sure your password is something you can easily remember or better still, save it on a notepad.
You will be redirected into your Bluehost dashboard where you can login into your WordPress account.
2. Website Building Platform: To build a website from scratch, you will need to decide which platform to use in building your website. There are so many platforms and content management systems to choose from. We have platforms like Wix, Weebly, Squarespace, WordPress, Drupal and Joomla.
Some platforms require you to know a little bit of HTML / CSS or other coding languages, so you really need to know your website building ability but if you are a beginner, it is better you choose WordPress.org.
I will recommend WordPress for any one who just starting out because, WordPress is free, robust, and it can be installed with just one-click and it is used by over 40% of all websites on the web. It comes free with most hosting services out there and with Bluehost, it is automatically installed.
3. Make Your Website a Professional website via Customization.
Now it is time to install WordPress having purchased our domain name and hosting. One great feature of Bluehost is that WordPress is automatically installed during your course of signing up for your hosting account. To install WordPress or view your WordPress dashboard;
Log in to your Bluehost hosting account by entering your domain name and your password.
On the next screen, you are to enter your website details (Site title and tagline) and click continue.
Give a little info about yourself and your site, choose a theme or skip this step and once you’ve done this, the WordPress installation will happen automatically.
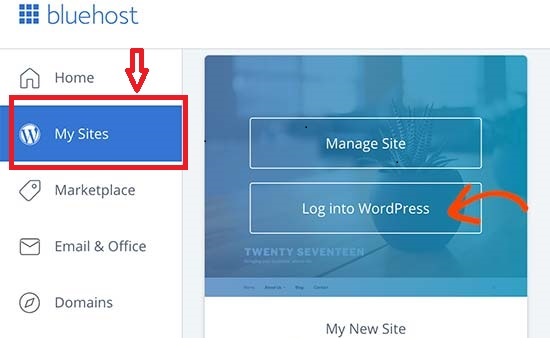
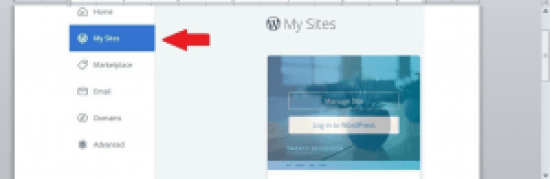
Having logged into your Bluehost dashboard, the next thing to do is to click on the My Sites option in the left hand navigation bar.
Click on the login to WordPress button.
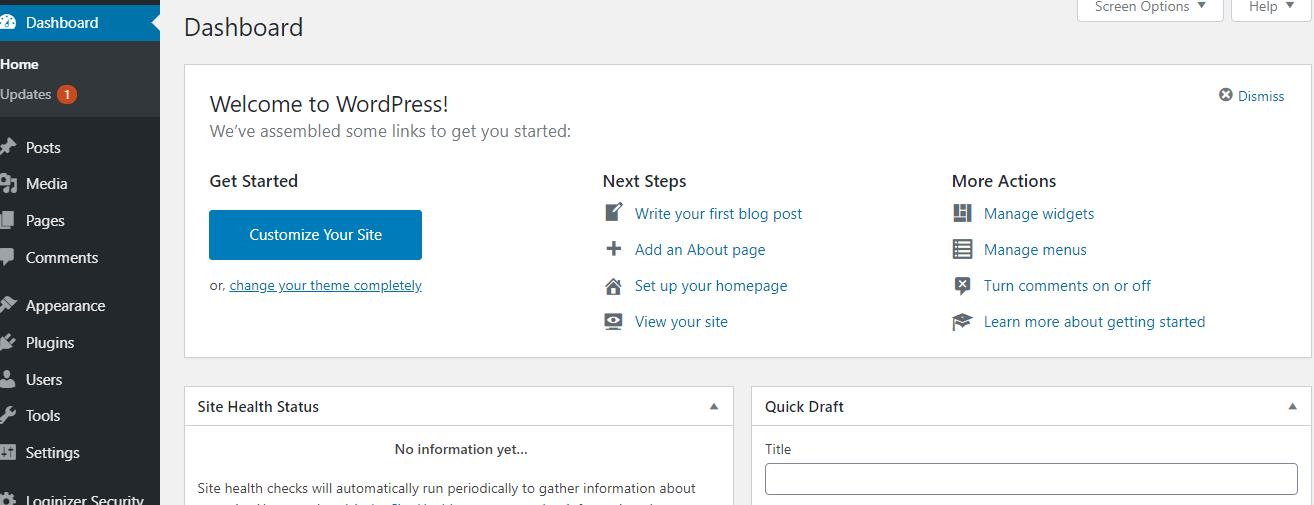
Congrats! You are in your WordPress Dashboard.
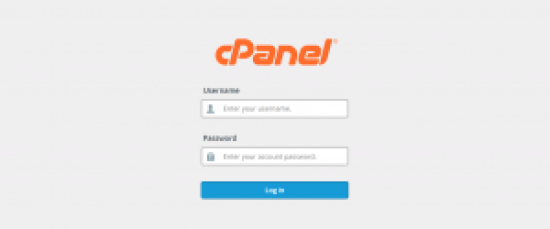
When you check your email, you will discover that Bluehost must have sent you your cPanel login details and a confirmation message. Click on the confirmation link to confirm your account. Remember to save your login details in a place or on a notepad.
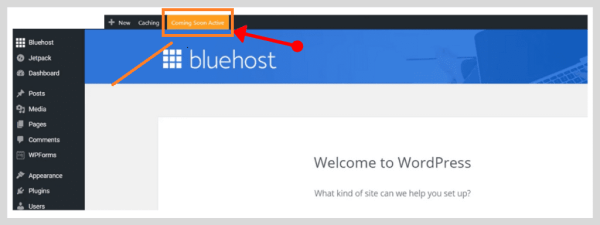
Click the coming soon active button and click launch your site to make your site live!
Next, choose a theme for your website. Although, WordPress automatically installs a theme for you during installation of WordPress but you can always change it to the theme of your choice. There tens of thousands of WordPress themes to choose from right from your WordPress dashboard and you can also go for a Premium theme.
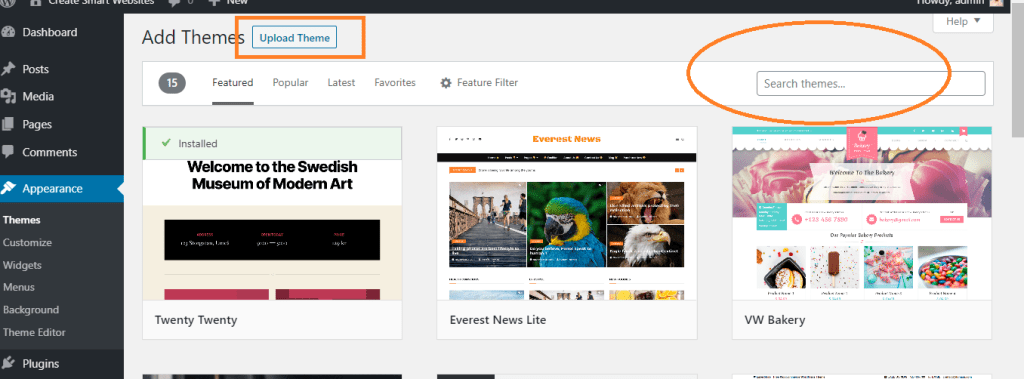
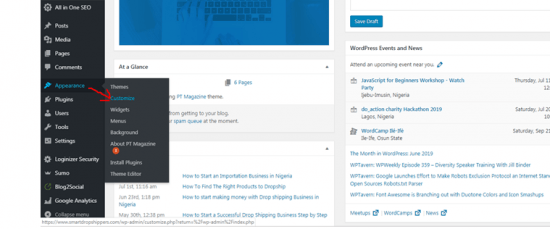
To install a theme or change a theme, click on Appearance then click on Themes. This will redirect you to the main page for WordPress’ free themes section.
Click on the Add New button and search for your desired theme in the search box. You can also search for themes via Most popular, featured themes or Latest Themes. You can also upload a Premium theme for more professional looking site.
A Premium theme will help in customizing your website to your taste. A premeium theme has reliable code base and be rest assured to get support if anything goes wrong with your site.
To install your premium theme, click appearance>>theme>>add new>>upload theme>>click on install>>activate.
Next, install some WordPress plugins to aid your website customization and growth.
Plugins helps in adding extra features and functionality to your website. It helps in turning a normal website into an online store or membership site in minutes.
To install a plugin, from your WordPress dashboard>>click on plugin>>add new>>search for plugin you intend to install>>click on install and activate after installing.
Some of the useful plugins you will need to install are;
Rank Math/All in one Seo Pack/Yoast: These plugins help keep your site SEO friendly and alerts you of any issues concerning your website. You can install of the plugins
Contact Form 7 : This plugin allows you to create and manage multiple contact forms on your website.
WPCatche: This helps to speed up your website loading time.
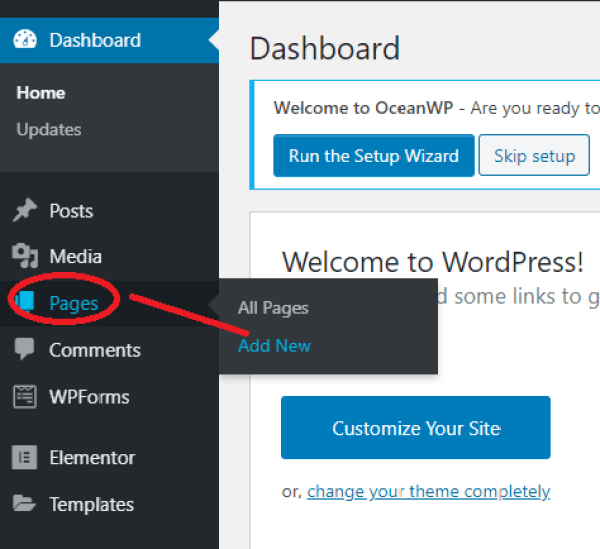
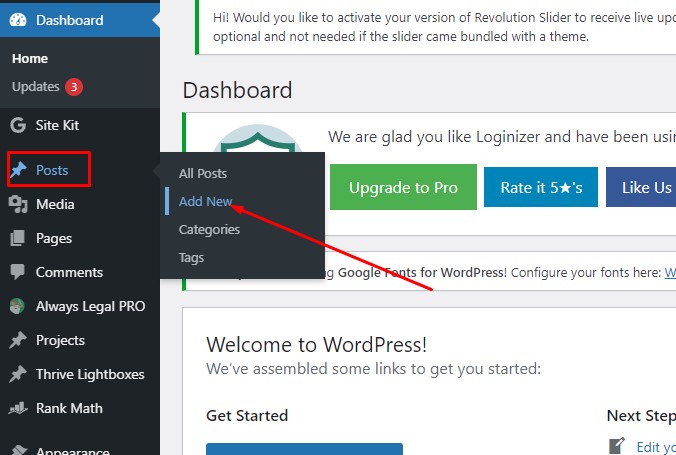
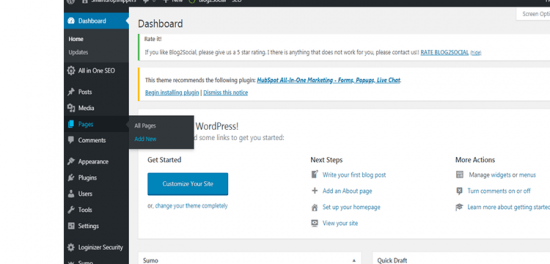
Next step on how to build a website from scratch is to create your website pages starting from the home page, about me page, services page etc. To create your website pages, go to the pages section from the dashboard>>click on add new page>>type in your page title>>click on publish. Follow the same step to create all your pages then create your site navigation.
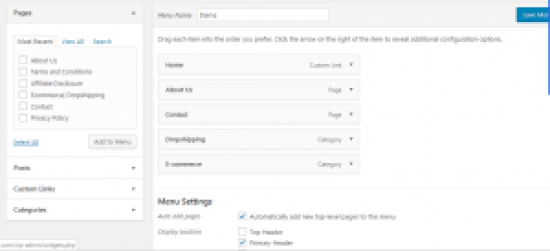
To create your site navigation, you will need to create a Menu and add items to your menu. The items to add are the pages you created earlier.
To do that click on appearance >>Menu >> Click on add new >>Name the menu and click on save. Then add some of the pages, posts or categories to the menu and click on save. Refresh your site to see all your pages, post or categories links showing on the menu bar.
In addition to creating pages, you may want to have a blog section on your website which is a good idea. All your published contents will be in the blog feed and will be added via the post section of your WordPress dashboard. You can as well divide your blog posts into categories for easy navigation by your website visitors.
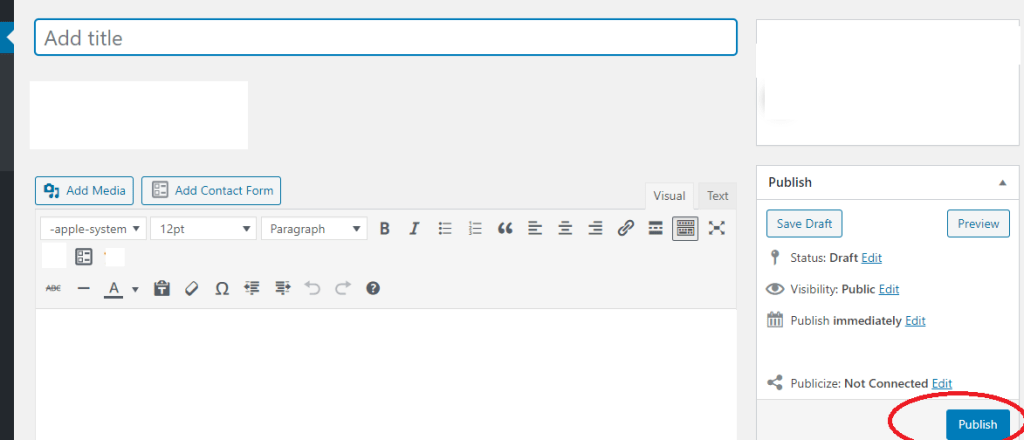
To create a blog post, click the post section from your WordPress dashboard >>Click on add new >> Write you post title or headline >>write your contents on the text editor and click the publish button.
Congratulations! You have just build a website from scratch. If you are stock in any way, do feel free to contact me directly or by making use of the contact form. If you find this post interesting and educating, do share it with your followers on social media. Remember to drop your thought on this post in the comment section.
Considering beginning your own blog? This article would direct you on how to build a blog website without any stress and furthermore tell you the best way to bring in cash writing contents on your blog. Starting a blog has a low venture yet a great potential for profit. This is a beginners’ guide to building and publishing contents to your blog. Beginning a blog is something you can do in under an hour yet bringing in cash from your blog would require a solid foundation.
Disclaimer: This post contains Affiliate links. I may get a little commission at no additional expense to you.
By the way, do you wish to start a blog the right way? Sign up for my FREE Blogging Email Course to get started………..Click Here
In this article, you are going to learn step by step the best way on how to build a blog website without any stress, you can bookmark this post for later use and I will likewise like it if you can share this post with your loved ones.
In building a blog website, we are going to be using WordPress. The following instructions will show you how to build a blog website on WordPress step by step.
For those that doesn’t have any idea what a blog is, a blog is a site that is refreshed with contents or blog posts consistently on a specific subject or topic.
To begin building and writing on your blog, you need to carry out the following steps:
Stage 1: Choose Your Blog Niche
Your blog specialty is the niche or topic you might want your blog to be known for. It is the thing that you plan to talk about on your blog. What are you energetic about? What do individuals say you realize how to do best and they will be willing to pay for? Consider everything and start your blog. On the off chance that you can’t concoct a point or specialty immediately, don’t stress Just begin your blogging journey first and you later pin it down to a specific topic.
Stage 2: Pick a Domain Name
To build a blog website you need to pick an appealing domain name for your business. Your domain name is your blog’s location on the web.
In picking a domain name, pick a name that can be effortlessly recalled, make your picked name identified with your blog specialty so your followers can immediately understand what the site is all about. Additionally, is you can’t come up with name then use your own name.
Stage 3: Chose a Hosting Plan
If your blog is going to be for real online business, please consider choosing the best hosting services for your blog. I would recommend you put your blog on a self-facilitated administration or self hosting services. A free writing or blogging platform like Blogger, Wix, WordPress.com, and so on wouldn’t give you the opportunity and complete power over your contents.
Setting up a web hosting is amazingly straightforward and just takes a couple of minutes. In picking the best web hosting organization, I would suggest BLUEHOST for your blog hosting with BlueHost, you get your domain name for free but if you wish to separate your domain name supplier from your hosting company then use Namecheap. I am recommending Namecheap because is one of the least expensive domain name supplier out there and they have best deals in terms of services.
Also, Namecheapcan also help you host your website at affordable prices with free SSL, 99% Uptime and 24/7 support for your online presence needs.
However, Bluehost has an extraordinary offer on her hosting bundles beginning at just $2.95 every month, alongside a FREE domain name. Just make sure you use my affiliate link.
Type in your domain name either a current domain name or an existing one as appeared in the picture below Bluehost.
Next choose your hosting plan
Next step is to fill in the necessary information and consent to their terms of service then click on the submit button.
One of the good thing about Bluehost is that WordPress is automatically installed for you. All you require do is to follow the PROMPT to give one or two details about your business and you will be redirected to your dashboard.
Also, you will be prompted to choose a website theme, you can either pick a theme or skip this step by uploading your own free or premium theme later on
To upload your own theme,
Click on Appearance.
Click on themes
Click on add new.
Click on upload theme
Pick the theme to be uploaded from your PC.
Install and activate the theme.
It is important to note that the theme you picked or uploaded will determine the look of your website or blog.
Stage 4: Write Your First Blog Post
Compose your first blog post! For new bloggers, I would prescribe getting 5 to 10 strong blog posts up on the blog first and afterward begin dealing with building your blog audience. To compose your first blog post, click on post from your dashboard.
Click on add-new post.
Add your blog contents, add images and click the publish button.
Stage 5: Make Money Blogging!
Presently we should discuss how to bring in cash publishing content to a blog. It is possible to start monetizing your blog right way but the best practice is to gain some credibility and authority in your chosen niche first.
Some of the ways by which you can make money online with your blog are;
Selling Digital Products Online: This is actually my number one method of bringing in cash as a website designer and a blogger. The fastest method to begin bringing in cash from your blog is to make your own item and begin selling it on your blog or on different platforms. You can begin by making eBooks or online courses and start selling them on your blog or website.
Affiliate Marketing: This is perhaps the most straightforward approaches to begin bringing in cash as new blogger in any niche. Affiliate marketing means showcasing other peoples’ items on your blog and consequently you get a commission whenever somebody purchases through your affiliate link.
Promotion/Online Advertizing: Advertising is another great method of bringing in cash writing on your blog once you begin getting a decent measure of traffic to your blog. Some of these online advertizing networks that you use are, Google adsense, Monumetric, Mediavine and Adthrive, however, aside Adsense, you will require a great deal of traffic to be accepted into these other networks.
Conclusion on how to build a blog website;
Pick a blog niche for your blogging business
Register a domain name and get hosting for $2.95 every month with Bluehost or Namecheap for less than $30 a year.
Pick a theme for your blog. You can pick a free or get a top-notch theme.
Compose 5 to 10 blog contents and launch!
Build your Blog followership and start monetizing your blog.
It really easy to get a blog up and running in minutes however, blogging it’s not a get RICH quick scheme! To make cash in blogging, you should place in a ton of time and effort by regarding your blog as a business directly from the beginning in order to achieve your set goals
Learn how to design a business website step by step. This article will help you learn the simplest method that you can use to design a business website step by step using WordPress
As far as scaling your business online is concerned, to create or design a business website for your business can’t be overlooked which is one of the reasons for this article.
Disclaimer: This post contains affiliate links and i will get a commission if you make a purchase via my link at no extra cost to you
Not having a web presence for your business may mean that you are simply losing out on some aspects of sales in your business. For your business to locate more customers, you’ll need to design a business website for your business. A business website will help in growing your business faster and provides more reputation to your brand.
The good news is that you simply can actually design a business website for your business without one line of code using WordPress!
The step by step guide stated in this article will assist you to make one in minutes without the help of a web developer
An overview of what you’re getting to be learning during this tutorial are listed below;
Choose a Platform for your website
Buy name and hosting plan
Install WordPress and theme
Choose a Platform for your Business Website
Choosing the proper platform for your business website is extremely important to the success of your business. There are numerous platforms for building a business website but i will recommend WordPress because is the best platform for building and scaling your business faster. With WordPress, you’ll have access to many website templates, plugins, add-ons and extensions to create your website easily. WordPress has the best website builders in the world and it powers over 35% of the whole website on the web.
There are two types of WordPress – WordPress.org and WordPress.com. The one we are going to be using is the self-hosted WordPress which is wordpress.org. WordPress.com doesn’t give user the complete potential services except the user upgrades which is why we are going for the self-hosted one (wordpress.org) where you’ll be needing a website name and an hosting plan. And with this, you’ve got the complete right over your website.
Buy a website name and hosting plan
To have full control over your business website, you’ll need a website name and hosting in order to run your website successfully
A Domain Name is the name your business website will bear on the web and a webhosting would make your website visible to the entire world
Your name is your unique website address. Eg yourbizname.com and hosting plan is that the one that house your name . it’s important you create a name that is associated with your business and let it be memorable by keeping it simple, catchy and short.
Choosing a reliable Webhosting for your business website is really vital . I will gladly recommend Bluehost due to the following reasons;
24/7 support, superb customer service, a free name , free SSL certificate, one click WordPress installation, 99.9% uptime, 30 days a refund guarantee, easy to use Cpanel, an enormous discount on hosting price and officially recommended by WordPress.org. Using Bluehost goes to save lots of you an entire lot of stress and money within the future
If you’d like to separate your name from your hosting then, i will recommend namecheap for cheaper domain names
Also, if you’re really on a small budget, i will advise you begin with namecheap due to their superb customers’ service but Bluehost is the best if you can afford it.
Let’s register your domain and hosting together by visiting www.bluehost.com
Click on the “Get Started” button to continue.
On next page you’re to choose a plan.
Next, is to type in your name or link an existing name .
Please note that if you have already got a website name, you’ll got to link the nameserver of that domain there to of bluehost.
Next page is to enter your details as shown within the image below;
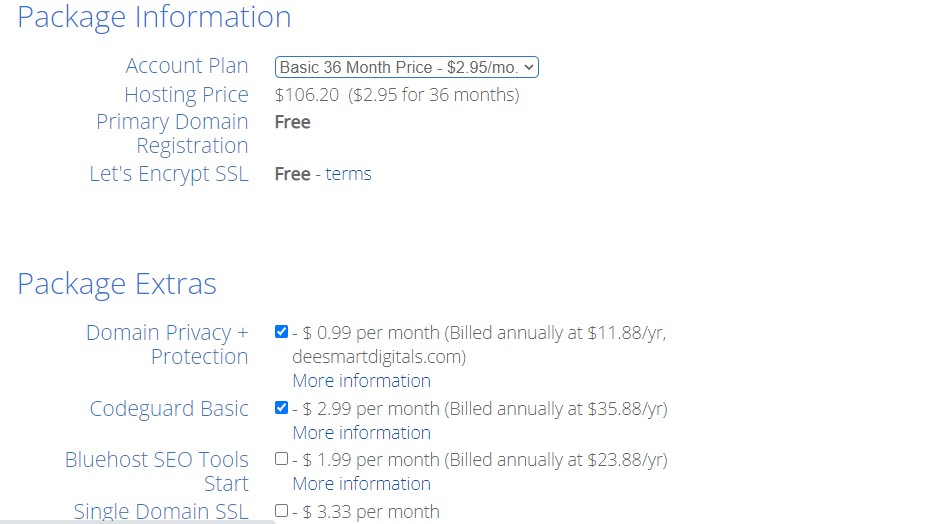
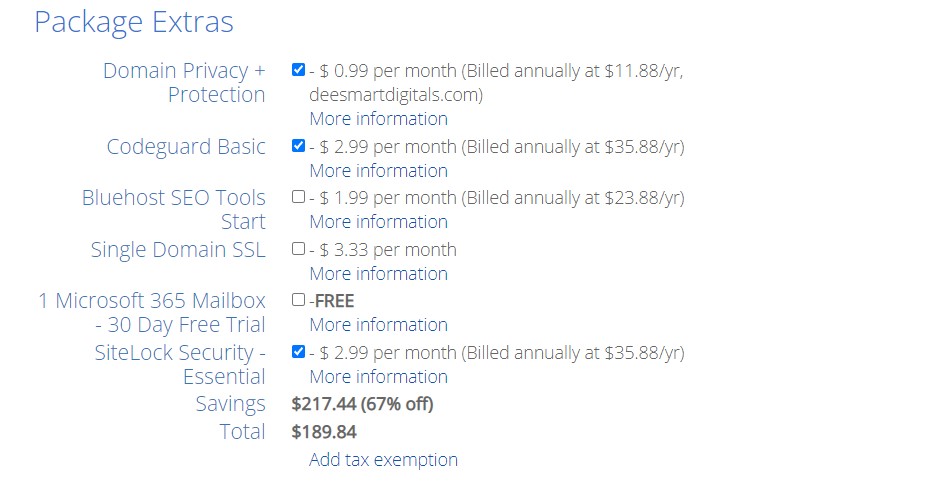
On the next page, choose your package plan. Either 12, 24, or 36months base on your choice. the price reduces when the month you chose increases.
The remaining boxes should be left blank apart from “Domain Privacy Protection
Enter your credit cards details to checkout on subsequent page.
Then scroll down and tick the “Terms of Service” to agree then finally click the submit button.
Congratulations! you just completed the first stage of your business website design for your business
Next Step: Install WordPress
Another great feature of Bluehost is that WordPress is automatically installed for you while checking out during the course of your registration. Immediately after submitting your details during checkout, you’ll receive a registration successful message and can even be prompted to create a password.
Click on create a password and check your email for the login details sent to you from Bluehost.
Login into your Bluehost client area by clicking on “My site”
login to your WordPress admin dashboard through yourbizname.com/wp-admin or via your Bluehost dashboard by clicking the “Login to WordPress” button to start customizing your website. You may be prompted to choose a theme, you can either choose a free theme or upload a Premium theme or skip that step to go to your dashboard. Also, to login to your cPanel use cPanel login details by typing in www.yourbizname.com/cpanel into your browser.
Next: Add your website Pages
Now that your WordPress site is live, it’s time to start customizing it by adding some important pages like the Home page, About Us page, Contact Us page, Our Services/Products page, Blog page etc. you create your pages base on your business needs using your business information
To create a page, login to your WordPress dashboard, visit Pages >> Add New, type the name of the page within the tittle and provides a quick history about your business, then click on publish by the right hand side of the page as shown below;
Add Themes, Menus, and Plugins for more Functionality.
One of the amazing features of WordPress is that it’s various inbuilt plugins and add-ons that might help in improving your business website overtime. it’s also possible to vary and customize your website themes without stress. There are thousands of free and paid themes you can install to customize the looks of your website.
To customize your theme, attend Appearance>> Customize >> Customize to your taste
The next step is to feature your navigation menus by clicking on Appearance>> Menus >> provides it a name>>Select the pages or categories you’ll wish to include in the menu>> choose where you would like the menu to show >> click save.
On WordPress platform, there’s virtually no feature/functionality you would like on your site that has no plugin. There are over 20,000 free plugins that you simply can easily install and activate on your website. you’ll use most of those plugins to display several features on your website without writing one line of code.
Below are a couple of recommended plugins you would possibly have to install on your business website:
Yoast SEO/All in One SEO Pack/Rank Math:– These plugins help to enhance your business website for the search engines. It enables you to be getting free organic traffic to your business from search engines.
MonsterInsights/Google Analytics: plugin helps in monitoring or tracking your website visitors, With the plugin, you get to understand your audience, their location and every one that.
Wp Super Cache plugin: This plugin helps to enhance the speed of your website.
Updraft plugin– helps copy your website content.
WPForm: this plugin helps you to feature contact forms to your website which allows your users to attach with you using the shape.
I hope this piece of content helps you design a beautiful, professional and responsive website.
If you find this post interesting and educating, do share it with your followers on social media. Remember to drop your thought on this post in the comment section.